Asphalt driveway repair starts with identifying the damage. Hairline cracks under ¼ inch are early-stage surface failures we can often handle ourselves with liquid crack filler. Cracks between ¼ and 1 inch signal deeper stress, while anything wider points to serious base failure. Potholes need immediate structural attention. Minor damage is DIY-friendly, but extensive damage calls for a professional. There’s a lot more to know before you grab that first tool.
How Bad Is the Damage? Reading Your Driveway’s Warning Signs

Before spending a single dollar on repairs, we need to honestly assess the extent of the damage. A proper damage assessment saves us from wasting money on temporary fixes when full replacement is actually necessary.
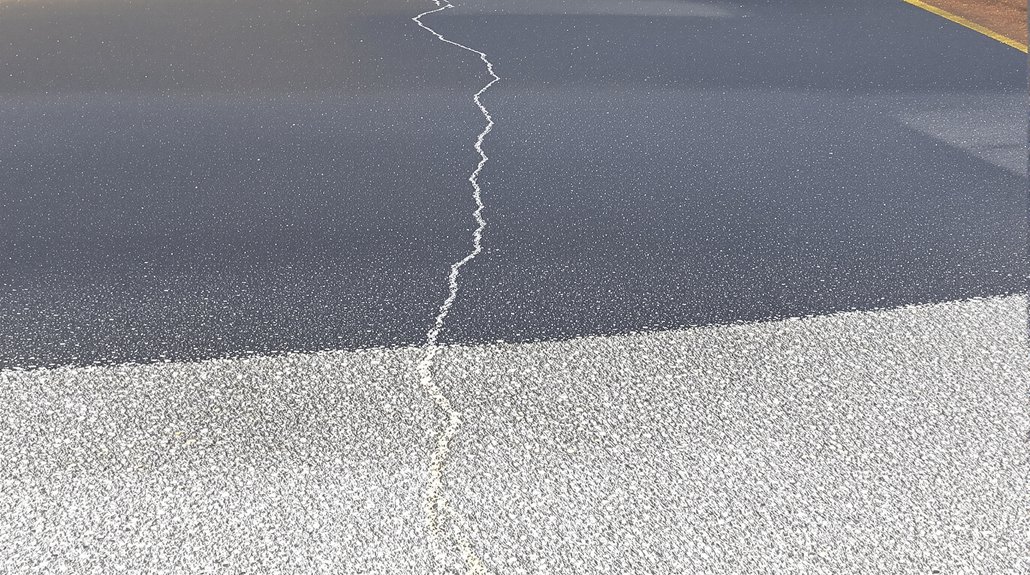
Start your crack evaluation by identifying crack width and pattern. Hairline cracks under a quarter-inch wide are early-stage surface failures we can seal effectively. Cracks between a quarter-inch and an inch suggest deeper structural stress. Anything wider signals serious base failure.
Not all cracks are equal — width and pattern reveal whether you’re facing surface wear or serious structural failure.
Also watch for these warning signs:
- Alligator cracking – interconnected cracks resembling reptile skin indicate base failure
- Potholes – structural damage requiring immediate attention
- Sunken areas – compromised sub-base beneath the surface
- Edge crumbling – lateral pressure or drainage problems
Honest evaluation determines whether we repair or replace.
DIY Asphalt Driveway Repair or Hire a Contractor?

Once we’ve assessed the damage, the next critical decision is whether to tackle repairs ourselves or call in a professional. For minor cracks and small potholes, DIY repair options are genuinely viable. Crack fillers, cold-patch asphalt, and sealcoating products are affordable and widely available.
However, a thorough cost analysis often reveals when professional help makes more sense. Extensive structural damage, large sunken areas, or widespread alligator cracking typically exceeds DIY capabilities. Attempting complex repairs without proper equipment can worsen the problem, ultimately costing more.
Consider these factors before deciding:
- Damage severity – Minor surface issues favor DIY; structural problems need pros.
- Available time and tools – Professional equipment delivers better results.
- Budget – DIY saves money short-term, but poor repairs can accelerate deterioration.
Tools and Materials for Asphalt Driveway Repair

Having the right tools and materials on hand makes the difference between a lasting repair and one that fails within a season. Before starting any asphalt driveway repair, we’ll want to gather everything upfront to avoid interruptions mid-project.
Here’s what we typically need:
- Crack filler – liquid or rope-style, depending on crack width
- Patch material – cold-mix or hot-mix asphalt for potholes and larger damaged areas
- Tamper or hand tamp – to compact patch material firmly
- Wire brush or broom – to clean debris from cracks and damaged sections
- Chisel and hammer – for breaking away loose edges
- Sealer and squeegee – for finishing and protecting the surface
Having these items ready before we begin keeps the job moving efficiently.
How to Fix Cracks in Your Asphalt Driveway

Fixing cracks before they widen into potholes saves us significant time and money down the road. We’ll first identify our crack types, since repair techniques differ based on severity. For hairline cracks under a quarter-inch, we apply liquid crack filler directly from the bottle, working it into the crack with a putty knife. Cracks between a quarter-inch and half-inch need rubberized asphalt-emulsion filler, which we pour in and smooth flush with the surface. For wider cracks exceeding half an inch, we clean out debris, fill with cold-patch asphalt, then compact it firmly with a tamper. Regardless of crack size, we let repairs cure fully before driving over them. Sealing the entire driveway afterward locks in our repairs and prevents new cracks from forming.
How to Patch Potholes in an Asphalt Driveway

Potholes demand immediate attention before freeze-thaw cycles and vehicle traffic deepen them into costly structural damage. Understanding pothole causes helps us choose the right repair techniques. Water infiltrates weakened pavement, expands during freezing, and fractures the surface, creating voids beneath.
To patch effectively, we’ll start by cutting the damaged area into clean, vertical edges using a cold chisel or circular saw. Remove all loose debris and apply a tack coat to help the new material bond. Pack cold-mix or hot-mix asphalt in two-inch layers, tamping each layer firmly. Overfill slightly, then compact the final layer with a hand tamper or rental plate compactor.
Check the patch after the first hard rain and add material wherever settling occurs.
When to Sealcoat After Asphalt Driveway Repairs
Timing sealcoating correctly after repairs can mean the difference between a long-lasting driveway and wasted effort. We recommend waiting at least 30 days after patching potholes or filling cracks before applying a sealcoat. Fresh asphalt needs time to cure fully, and rushing this step undermines the repair benefits we’ve worked hard to achieve.
Sealcoat timing also depends on weather conditions. We need dry weather with temperatures above 50°F for proper adhesion and curing. Applying sealer too soon over uncured patches traps moisture, causing bubbling, peeling, and premature failure.
Once the waiting period passes and conditions are right, sealcoating locks in our repairs, protects against UV damage, water intrusion, and oxidation, and extends the driveway’s lifespan greatly. Patience here genuinely pays off.
How to Make Asphalt Driveway Repairs Last

Once we’ve sealcoated at the right time, keeping those repairs intact comes down to consistent maintenance habits. Preventative maintenance is the real secret to extending your asphalt lifespan and protecting the investment you’ve already made.
Here’s what we recommend doing regularly:
- Fill new cracks immediately before water infiltrates and widens the damage
- Keep the surface clean by removing oil, gas, and chemical spills promptly
- Manage drainage so water doesn’t pool and weaken the base layer
- Avoid heavy loads that stress repaired sections beyond their capacity
- Reseal every three to five years to maintain a protective barrier against UV rays and moisture
Staying proactive costs far less than letting small problems develop into full-depth failures requiring complete replacement.